
Allen Bradley PLC Programming With Studio 5000
This session fallowing task will be complete.
1.Create a new project
2. Write ladder logic
3. Use symbolic tag names
4. Use the tag monitor/editor
Creating New Project using Studio 5000
For details about softwear please visit rockwell automation official web site.
http://www.rockwellautomation.com/rockwellsoftware/products/studio-5000.page
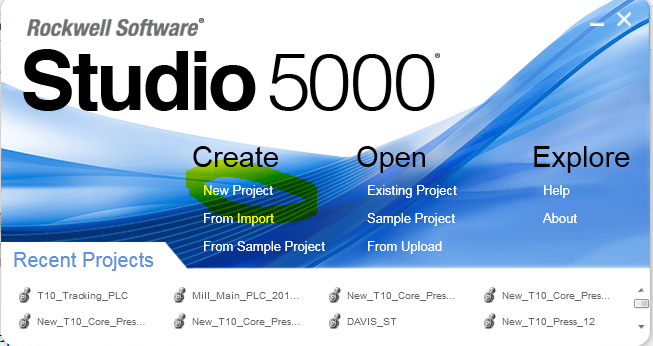
* Go to start menu ->Rockwell Softwear -> Studio 5000

Creating a New Controller Project
In this Secession, you will create an offline project using a CompactLogix 1769-L18ER controller.
1. From the Main window Select new project.Then next dialog box appear.
2. From next window please select controller Type.Type project name.Then click next.

3.Then new dialog box appear.Select revision & expansion module & click finish.

The Controller Organizer appears on the left side of the RSLogix5000 window, with a folder called
Controller Controller1.
At this time, there is no I/O, tag database, or logic associated with the controller
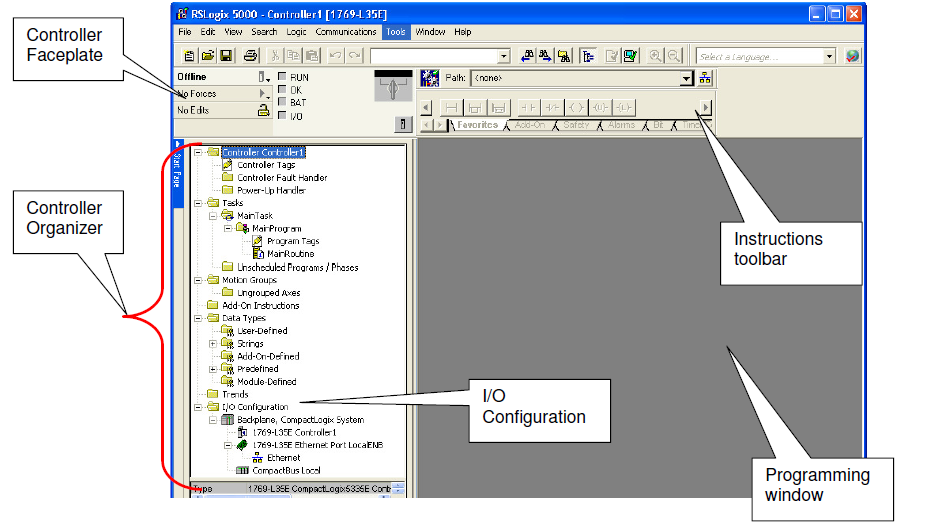
The Controller Organizer is a graphical representation of the contents of your controller
file. This display consists of a tree of folders and files that contain all of the information
about the programs and data in the current controller file. The default main folders in this
tree are:
Controller File Name
Tasks
Motion Groups
Add-On Instructions
Data Types
Trends
I/O Configuration
The square containing a ‘+’ or ‘-‘ indicates whether a folder is open or closed. Click
on it to expand the tree display and display the files in the folder. The - sign indicates
that the folder is already open and its contents are visible. By default the Add-On
instructions folder is empty as none are installed by default.
Adding Ladder Logic to the Main Routine
In this session you will add code for a simple motor start/stop seal-in circuit. You will experience the ease of
programming with RSLogix 5000 software. During the session we will only utilize ladder logic programming,
but Logix controllers also can be programmed using Function Block, Sequential Function Charts, and
Structured Text. This allows you to select the program language that best fits an application.
You will continue to use the project already opened.
1. In the Controller Organizer expand the MainProgram folder by clicking on the +.

2. Double-click the MainRoutine icon.then fallowing window appear.

3. From the instruction toolbar, left click and hold on the Examine if Closed (XIC) instruction

4. Drag the XIC onto rung 0 until the green dot appears as shown above. Release the mouse button at the location you wish to place your instruction.
5. Verify your rung appears like the figure below


appear to the right of the XIC instruction indicating where your new instruction will be inserted.
Release the mouse button at the location you wish to place your instruction.
8. Verify your rung appears like the figure below:

